Refer all servicing to qualified service personnel. Servicing is required when the apparatus has been damaged in any way, such as:

WARNING! Do not expose the apparatus to dripping or splashing. Do not place objects filled with liquids near the apparatus.
WARNING! To reduce the risk of fire or electric shock, do not expose this apparatus to rain or moisture.
WARNING! Equipment must be connected to a Mains socket outlet with a protective earth connection.
WARNING! Never push objects of any kind into the apparatus through openings as they may touch dangerous voltage points or short-circuit parts that could result in a fire or electric shock.

IMPORTANT! The Mains Plug is used as the disconnect device and it shall remain readily operable.
IMPORTANT! Ensure adequate ventilation. Do not install in a cabinet that is smaller than 60cm (24”) wide x 45cm (18”) deep x 20cm (8”) high. If you do the device may overheat.
The AC fuse inside the unit is not user-serviceable. If you cannot turn on the unit, contact the dealer from whom you purchased this unit.
Occasionally you should dust the unit all over with a soft cloth. For stubborn stains, use a soft cloth dampened with a weak solution of mild detergent and water. Dry the unit immediately afterwards with a clean cloth. Don’t use abrasive cloths, thinners, alcohol, or other chemical solvents, because they may damage the finish or remove the panel lettering.
WARNING! BEFORE PLUGGING IN THE UNIT FOR THE FIRST TIME, READ THE FOLLOWING SECTION CAREFULLY.
AC outlet voltages vary from country to country. Make sure that the voltage in your area meets the voltage requirements printed on the unit’s rear panel. e.g. 110V-240V ~ 50/60HZ.
The power cord is used to disconnect this unit from the AC power source. Make sure that the plug is readily operable (easily accessible) at all times.
If you do not intend to use the unit for an extended period, remove the power cord from the AC outlet.
The unit is defined as Class1 in EN62368 (low voltage directive) and MUST BE EARTHED. Connect only to a mains socket outlet with protective earth, and only use the power cord supplied.
Never handle this unit or its power cord while your hands are wet or damp. If water or any other liquid gets inside this unit, have it checked by your CasaTunes dealer
The AC fuse inside the unit is not user-serviceable. If you cannot turn on the unit, contact the dealer from whom you purchased this unit.
Under no circumstances should the speaker output terminals of the unit be short circuited, grounded or connected to another output.
Avoid installing the amplifier in positions where the front panel is exposed to direct sunlight – may cause control to become sluggish.
We declare under our sole responsibility that this product, to which this declaration relates, is in conformity with the following standards:
Following the provisions of Low Voltage Directive 2006/95/EC and EMC Directive 2004/108/EC, the EC regulation 1275/2008 and its framework Directive 2009/125/EC for Energy-related Products (ErP).
This product has been certified and conforms to UL62368-1: 2019 and certified to CSA C22.2 No. 62368-1-19
FCC interference statement
This device complies with Part 15 of the FCC Rules. Operation is subject to the following two conditions: (1) This device may not cause harmful interference, and (2) this device must accept any interference received, including interference that may cause undesired operation. certified and conforms to UL60065 and certified toCAN/SSA, IEC 60065
IMPORTANT! Changes or modifications not expressly approved by the party responsible for compliance could void the user’s authority to operate the equipment.
NOTE: This equipment has been tested and found to comply with the limits for a Class B digital device, pursuant to Part 15 of the FCC Rules. These limits are designed to provide reasonable protection against harmful interference in a residential installation. This equipment generates, uses, and can radiate radio frequency energy and, if not installed and used in accordance with the instructions, may cause harmful interference to radio communications. However, there is no guarantee that interference will not occur in a particular installation. If this equipment does cause harmful interference to radio or television reception, which can be determined by turning the equipment off and on, the user is encouraged to try to correct the interference by one of the following measures:
NOTE: THIS CLASS B DIGITAL APPARATUS COMPLIES WITH CANADIAN ICES-003.
For models having a power cord with a polarized plug:
CAUTION: TO PREVENT ELECTRIC SHOCK, MATCH WIDE BLADE OF PLUG TO WIDE SLOT. FULLY INSERT.
REMARGUE: CET APPAREIL NUMĖRIQUE DE LA CLASSE B EST CONFORME À LA NORME NMB-003 DU CANADA.
Sur les modèles don’t la fiche est polarisée:
ATTENTION: POUR ĖVITTER LES CHOCS ĖLECTRIQUES, INTRODUIRE LA LAME LA PLUS LARGE DE LA FICHE DANS LA BORNE CORRESPONDANTE DE LA PRISE ET POUSSER JUSQƯ AU FOND.
The features below are only available when using the CT-8X8MA with a CasaTunes music server to control one or more CT-8X8MA, CT-12X8MA and CT-5X4MA matrix amplifiers.
The amplifier has six separate amplified zones and two pre-amplified zones. Each zone has controls for bass, treble, balance, loudness, gain, mono and maximum volume limiting.
There are two pre-amplified zones, with up to 2VRMS output level (+9dB gain).
The pre-amplified zones include a low pass filter that when selected only passes low frequency audio, ideal for driving Active Subwoofers. When the low pass filter is selected the tone and loudness settings are defeated.
There is a 12V output signal on each pre-amplified zone when on.
You can have up to 96 zones by adding more CT-8X8MA, CT-12X8, and CT-5X4MA matrix amplifiers.
To share sources between amplifiers CasaTunes uses distributed sources, which allows any source connected to any matrix amplifier to be shared with all amplifiers using audio-over-IP.
The amplifier has eight separate input sources.
Sources 1-4 are Analog Stereo.
Sources 5-6 are Coax Digital Audio (PCM).
Sources 7-8 are Optical Digital Audio (PCM).
You can adjust the gain on each Analog Source, up to +18dB in 2dB steps.
For each zone you can configure up to a 600ms delay for each source.
Each zone sports a 7-band equalizer.
CasaTunes provides various Equalizer Presets you can select from. These presets are selectable in the Now Playing screen in the CasaTunesX App, and include music presets for Acoustic, Classical, Dance, Electronic, Hip-Hop, Jazz, etc.
The amplifier is controlled, monitored and programmed via Ethernet. In most instances, the CasaTunes music server will be used to control the amplifier.
CasaTunes automatically detects all your matrix amplifiers.
You can use the CasaTunesX App to check for, and update, the firmware on your matrix amplifiers.
The amplifier has 8 buffered IR emitters. Ports 1-8 have IR routing, and are intended to control specific input source components.
The amplifier may be readily set to the default settings. Restoring Defaults clears all memory and resets the zone allocations to zones 1 – 8
After an AC power outage the amplifier restores its settings to the pre-interrupted state. All internal settings are stored in non-volatile memory.
The amplifier automatically monitors the temperature and takes progressive action depending on the temperature.
When the temperature reaches:
The CasaTunesX App will warn the user when the safe operating temperature is exceeded.
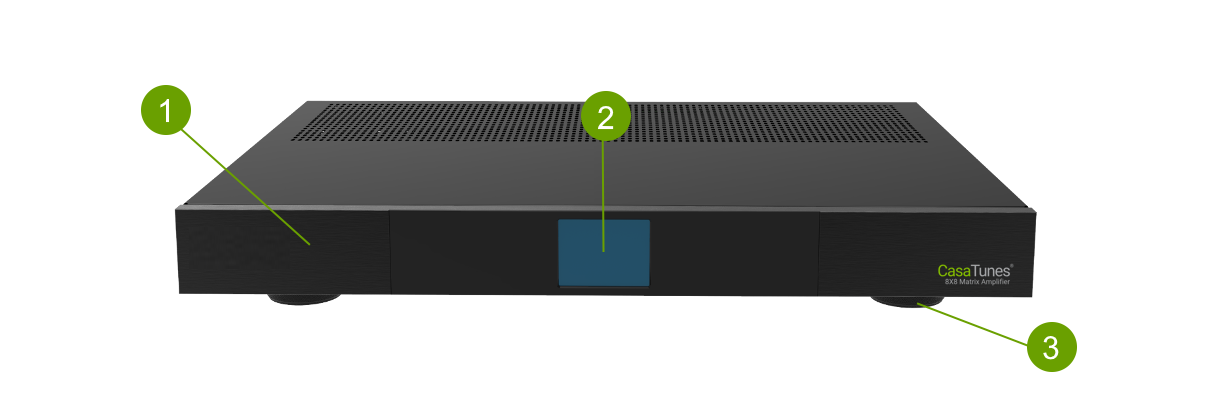
Solid Aluminium front Panel
LCD Touch Panel display for menu guided control and programming. The display is dimmed to “Off” after 15 minutes of inactivity
Set high enough to provide unrestricted airflow through the chassis for convection cooling
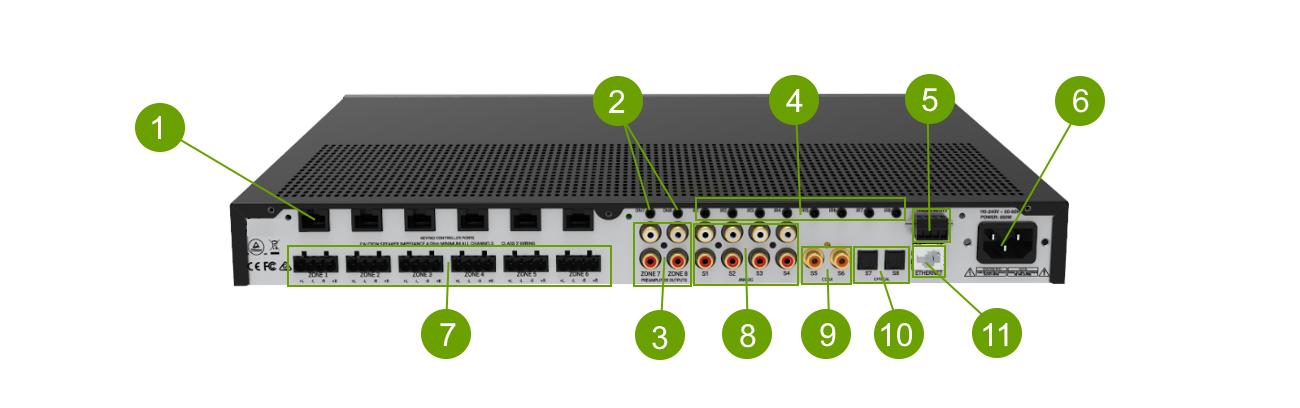
6 x assignable keypad/IR controller input ports
2 x Preamp 12V trigger outputs (3.5mm)
Zone 7 & Zone 8 analog audio L/R outputs
8 x 3.5 mm mono jacks. IR1 thru IR8 are used to control specific source equipment, where each IR port may be assigned to a specific keypad(s).
2 x Hardwired trigger inputs. Can be used for doorbells. (Wiring: 0V, IN1, IN2, 12V)
IEC Power Inlet 110-230V AC, 50-60 Hz
Plug in terminal clamp connectors accept 1.5mm² speaker wires
Source S1 – S4 analog audio L/R inputs
2 x Coax digital RCA inputs (PCM only)
2 x Optical digital inputs (PCM only)
10/100 Base T primary Ethernet port for connection to the Home network Router or switch
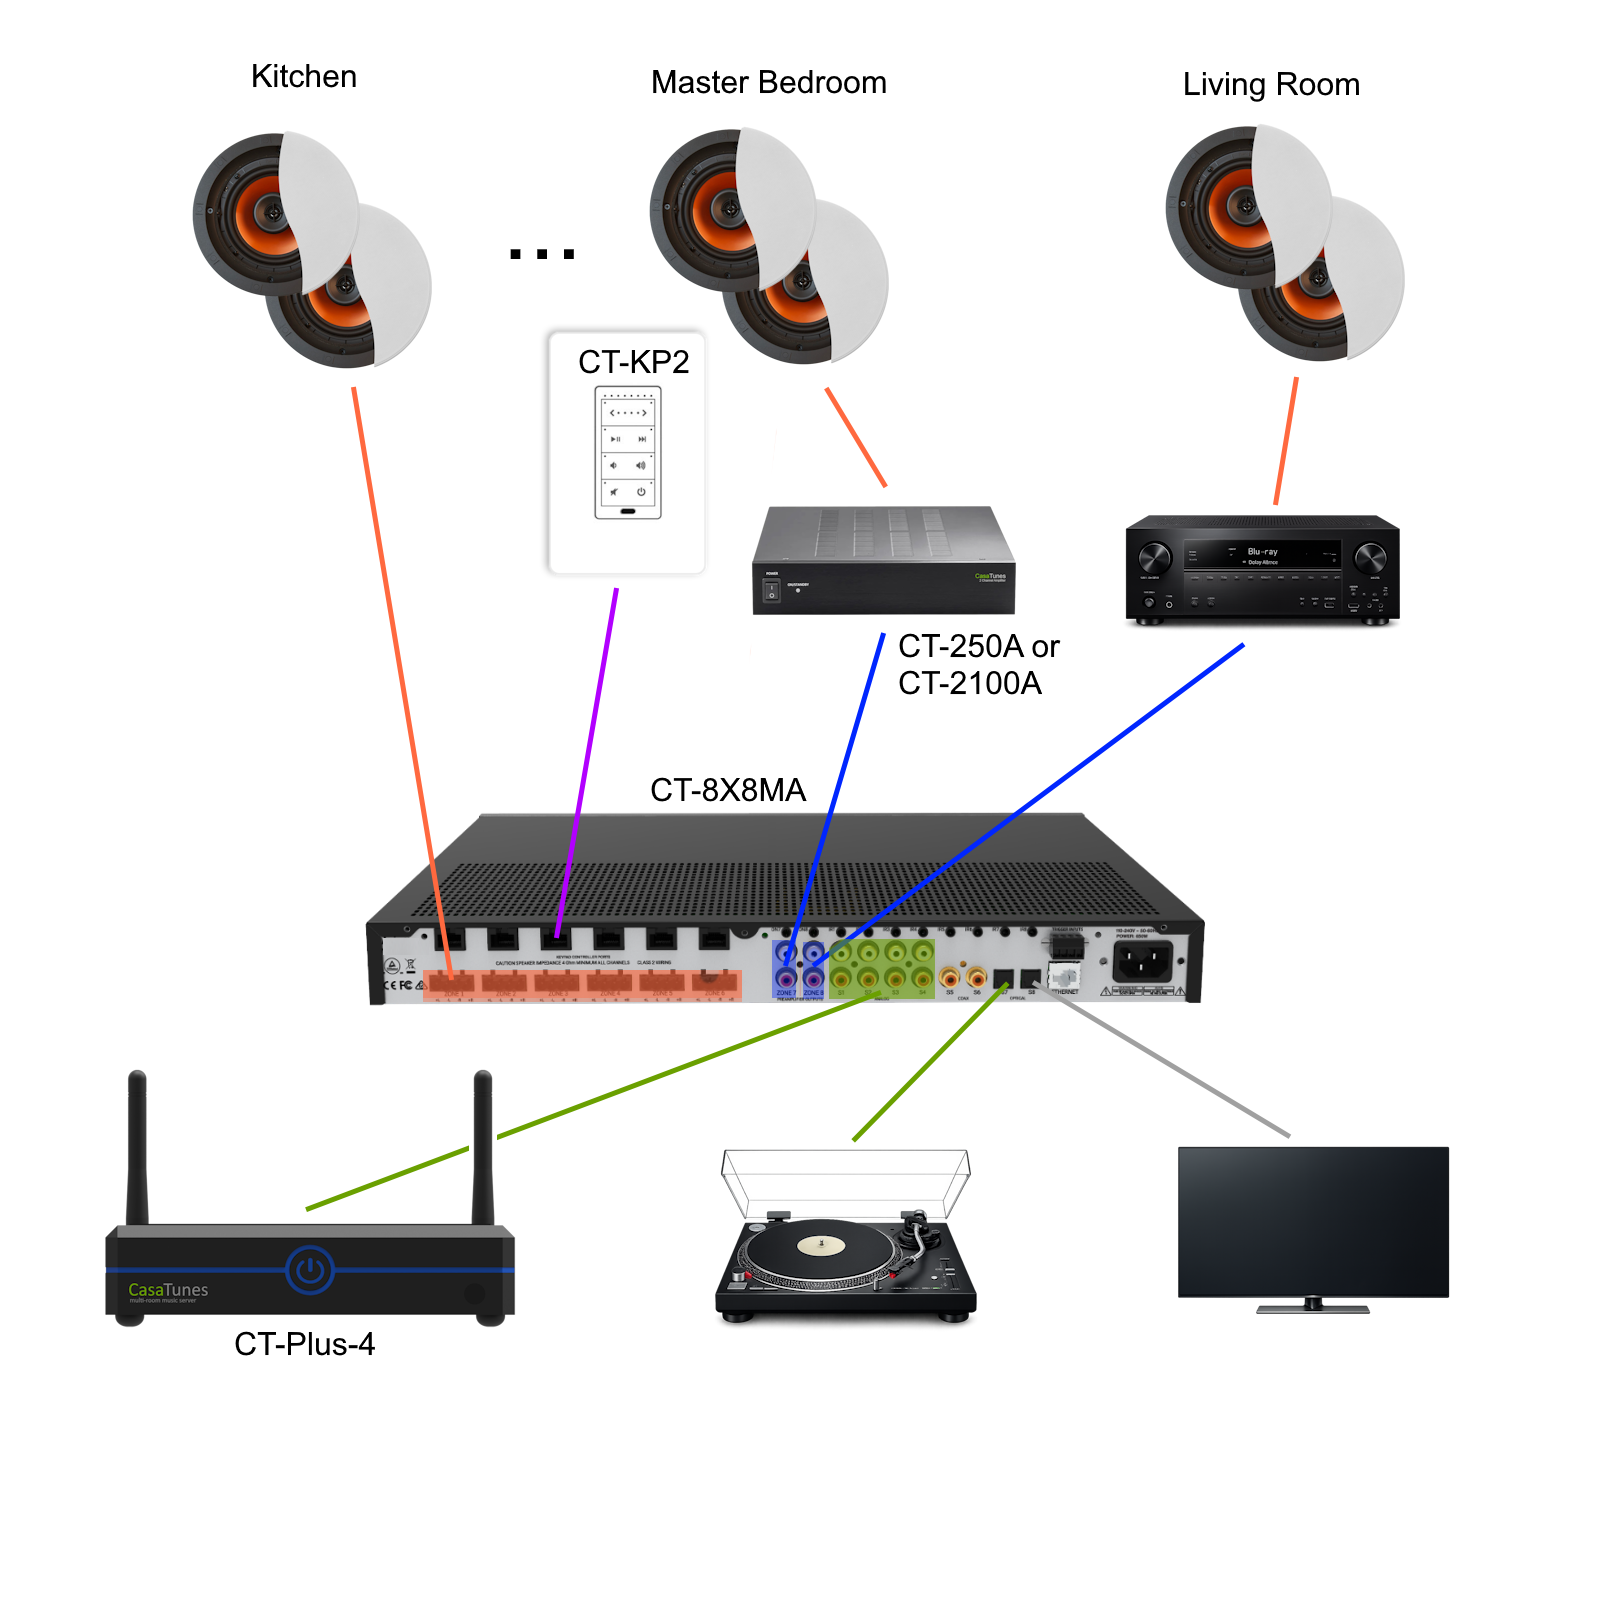
Figure 1 shows an example installation where the amplifier distributes audio to eight listening zones (only three zones are illustrated). Each zone can independently listen to any of the connected sources, including four CasaTunes music server streams, a vinyl player, or a TV output.
Each zone may have different control requirements. Select the controller that best suits the application. CasaTunes supports a wide range of control devices, including keypads, smartphones, tablets, HTML5 browser devices, Lutron PICO audio controllers, home automation panels and remotes, and Amazon Alexa-enabled devices for voice control.
The CasaTunes CT-KP2 keypads can be connected to any of the six keypad ports. Each keypad can be configured to control any zone in the system.
Source control IR emitters connect to the IR ports (IR1–IR8). These ports route source-specific IR commands from the connected keypads to the corresponding source device.
Speakers in each zone are connected to the amplifier by “Home Run” speaker cables.
The preamplifier output zones operate independently of the digital amplifier zones. A preamplifier zone can be connected to an external power amplifier—such as the CT-2100A stereo amplifier shown in the Master Bedroom for higher-power amplification—or to an AV receiver, as illustrated in the Living Room in this example.
The amplifier includes four stereo RCA analog audio inputs for connecting source equipment, along with four additional digital-only source inputs. Two of the digital inputs use coaxial connections, and two use optical connections.
Any zone can select from any of the connected sources. For example, someone in the Kitchen may be listening to Stream 1 from the CasaTunes music server, while someone in the Master Bedroom may be listening to Stream 2. Alternatively, both the Kitchen and Master Bedroom can listen to Stream 1 at the same time.
In larger installations, multiple amplifiers can be used together to increase the number of zones (and sources). You can add multiple CT-8X8MA amplifiers, or a combination of CT-8X8MA, CT-12X8MA and CT-5X4MA matrix amplifiers, providing greater installation flexibility. For example, you can use a CT-8X8MA with a CT-5X4MA when you need a 12 zone system.
When using a CasaTunes music server with more than one CT-8X8MA, CT-12X8MA and/or CT-5X4MA amplifiers, CasaTunes uses audio-over-IP and the built-in distributed sources capabilities of the amplifier to virtually connect sources between amplifiers.
To simplify setup in a multiple amplifier setup, CasaTunes implements a Master/Slave model. The master amplifier is the primary amplifier that CasaTunes communicates with (and always includes Zone 1). Slave amplifiers are any additional CT-8X8MA, CT-12X8MA and CT-5X4MA amplifiers on the network.
If one of the matrix amplifiers you are installing is a CT-8X8MA (or CT-12X8MA), we recommend you configure this amplifier as your master amplifier. All sources on the master amplifier, that are not hidden, are automatically configured as distributed sources, and are available to all the other matrix amplifiers.
CasaTunes automatically configures any CT-8X8MA, CT-12X8MA and CT-5X4MA matrix amplifiers when discovered on the network. Therefore, it is very important to add the master amplifier to the network first, before any additional amplifiers, otherwise the amplifier selected as the master will be unpredictable.
A major benefit of using audio-over-ip to share sources between amplifiers, is the amplifiers no longer need to be physically located next to each other, as long as they have access to the same network.
In addition, you can connect source equipment to any amplifier, and these sources are then available to all amplifiers. This allows support for more than 24 sources, and allows your source equipment to be located in any location where there is an amplifier.
If you are using a CasaTunes music server, you must configure the CT-8X8MA using the CasaTunesX App.
You can install the CasaTunesX App on your preferred device, including Amazon, Android, and Apple iOS devices, or you can use any HTML5 browser.
Learn more about CasaTunesXTo configure your CT-8X8MA, CT-12X8MA and CT-5X4MA matrix amplifiers, select the menu option in the CasaTunesX App header and navigate to Settings > System Setup as shown in the figure below.
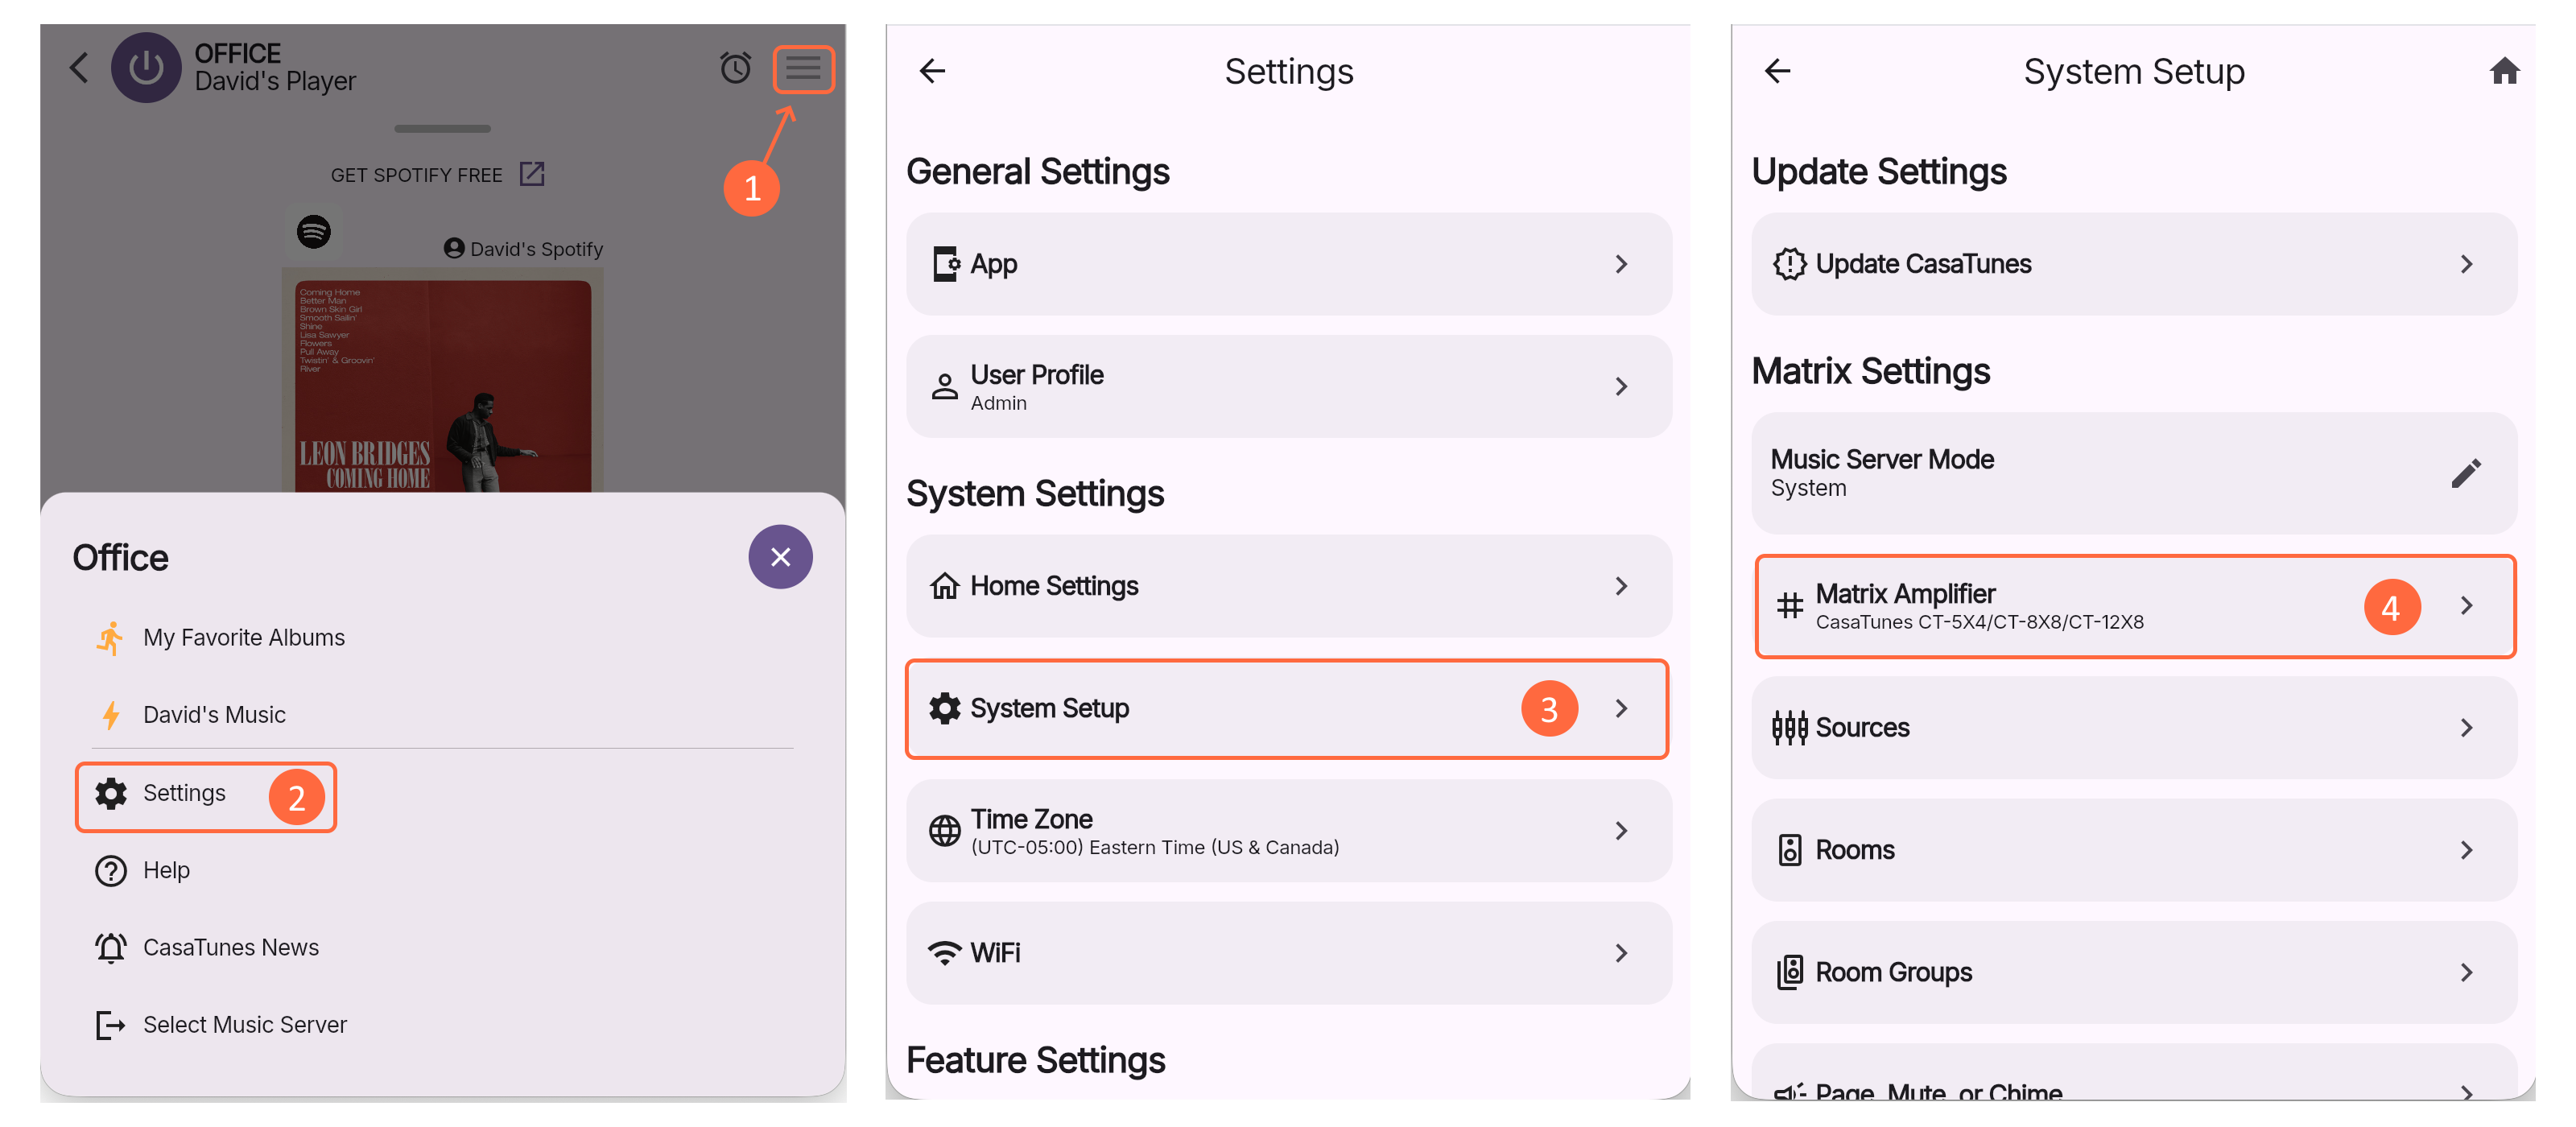
Navigate to Settings > System Setup > Matrix Amplifier and select CasaTunes CT-5X4/CT-8X8/CT-12X8 as the Matrix Model. The selected option is used to setup your CT-8X8MA, CT-12X8MA and CT-5X4MA matrix amplifiers. To simplify setup, CasaTunes automatically discovers the IP address of your master matrix amplifier.
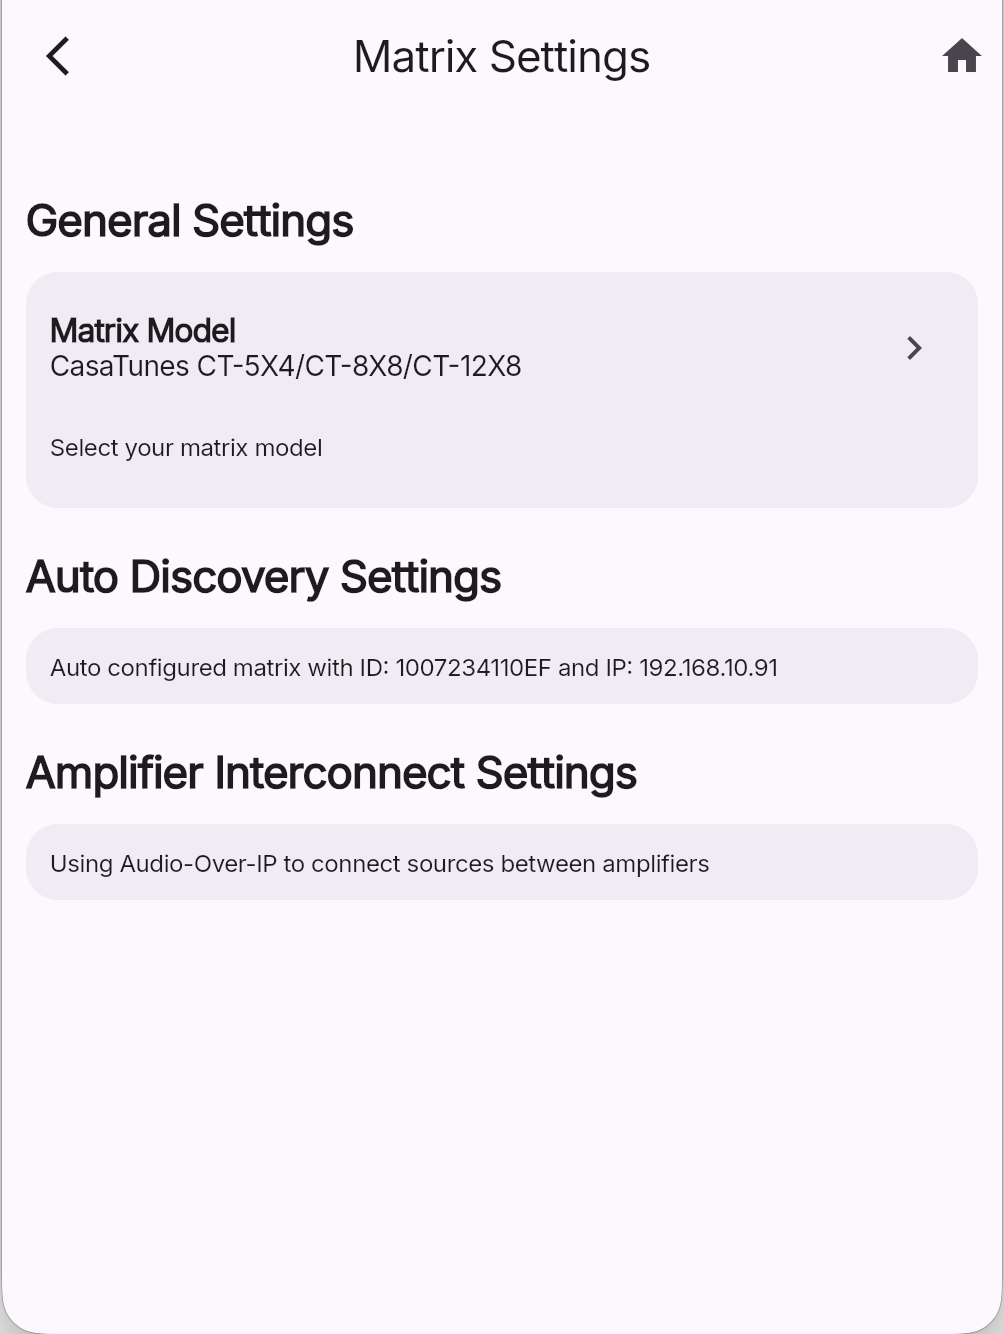
The Amplifier Interconnect Settings should be configured to use Audio-Over-IP to connect the sources between the amplifiers, when using more than one amplifier.
Navigate to Settings > System Setup > Sources to configure the sources for your matrices. The App displays all the available sources that are available on the first, or master amplifier (see previous discussion about Multiple Amplifiers).
All available sources are displayed in a horizontally scrolling list at the top of the screen, arranged in physical source order, making it quick and easy to select a source to configure. For each source, the interface shows the source number, source name, source type (for example, player or unsupported) and whether the source is currently visible.
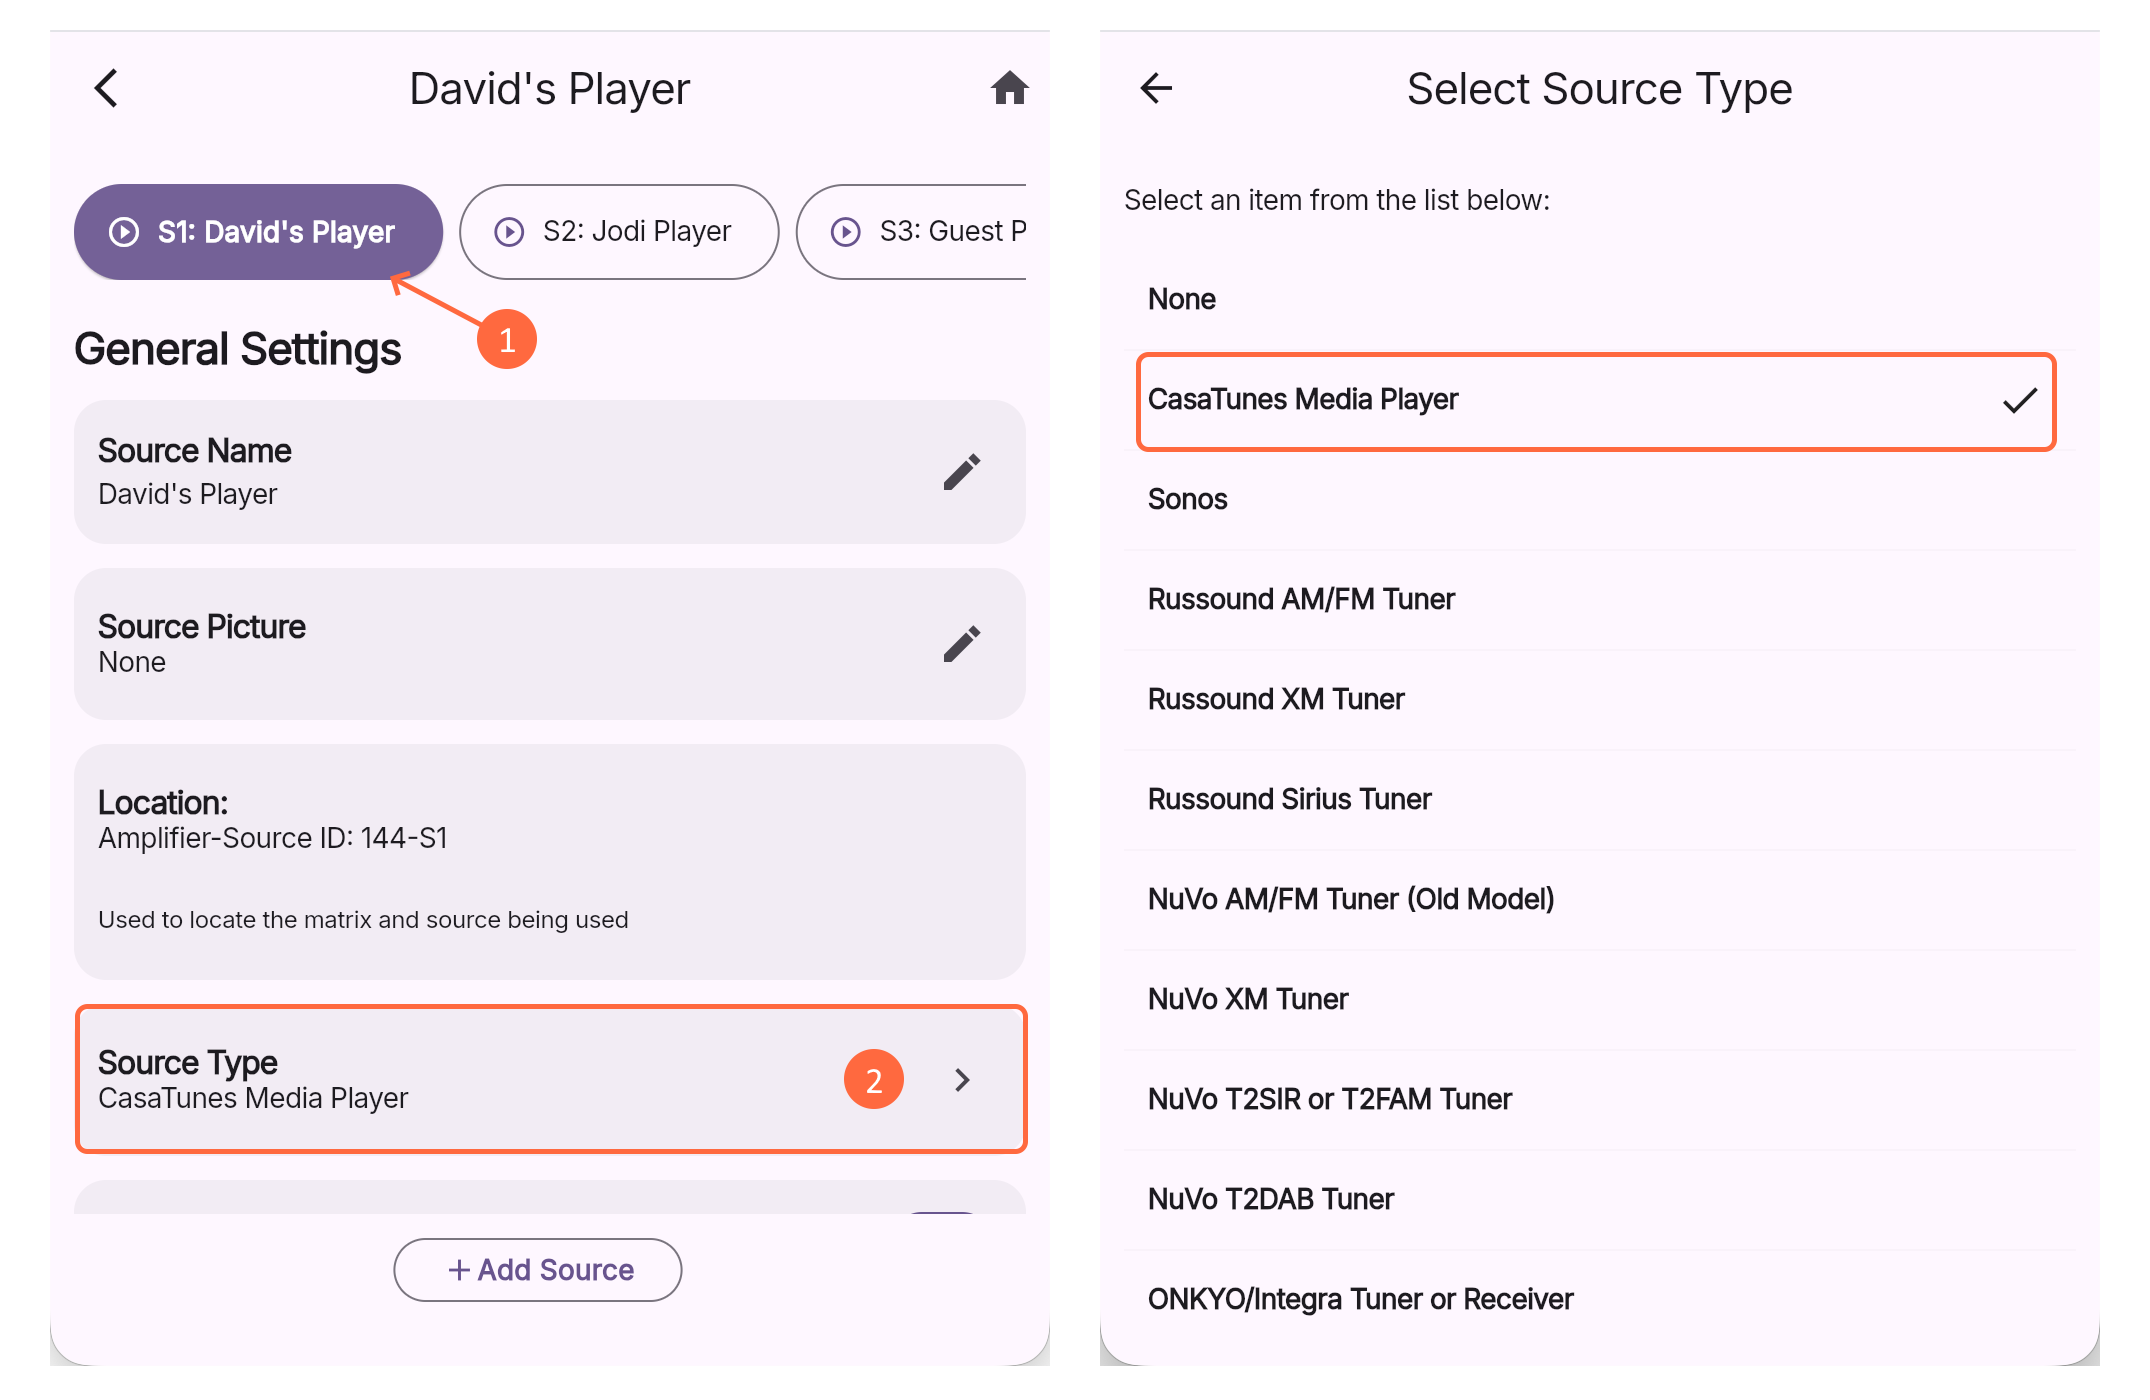
Select the source to configure the source settings. You can configure the Source Name, select the Source Type, whether to Display a Source, and depending on the Source Type selected, there may be additional settings to configure.
The most commonly used Source Types are:
The Location setting identifies which source this is. Since you can connect a source to any amplifier, the location setting identifies the amplifier, and which source on the amplifier, this source is connected to. In the example shown in Figure 4, the David Player source is located on the Amplifier whose ID is 144 and connected to Source 1.
The CasaTunes CT-8X8MA, CT-12X8MA and the CT-5X4MA matrix amplifiers support more than 24 distributed sources. Any input source, on any amplifier, can be configured as a distributed source. Distributed sources are shared (virtually connected) with all the other amplifiers via the network using a low latency audio-over-ip protocol.
To add a source that is connected to a slave amplifier:

Navigate to Settings > System Setup > Rooms to configure the rooms for your matrices. The App displays all the available rooms. This includes all the rooms available on all your matrices in your network. In addition, if you enabled SONOS support and/or transmission to AirPlay speakers, then all your SONOS and AirPlay speakers will be listed as well.
Similar to sources, all available zones are displayed in a horizontally scrolling list at the top of the screen, arranged in physical zone order, making it quick and easy to select a zone to configure. For each zone, the interface shows whether the zone is visible, the zone number and zone name.
To configure a specific room, select a zone from the horizontal zone list.
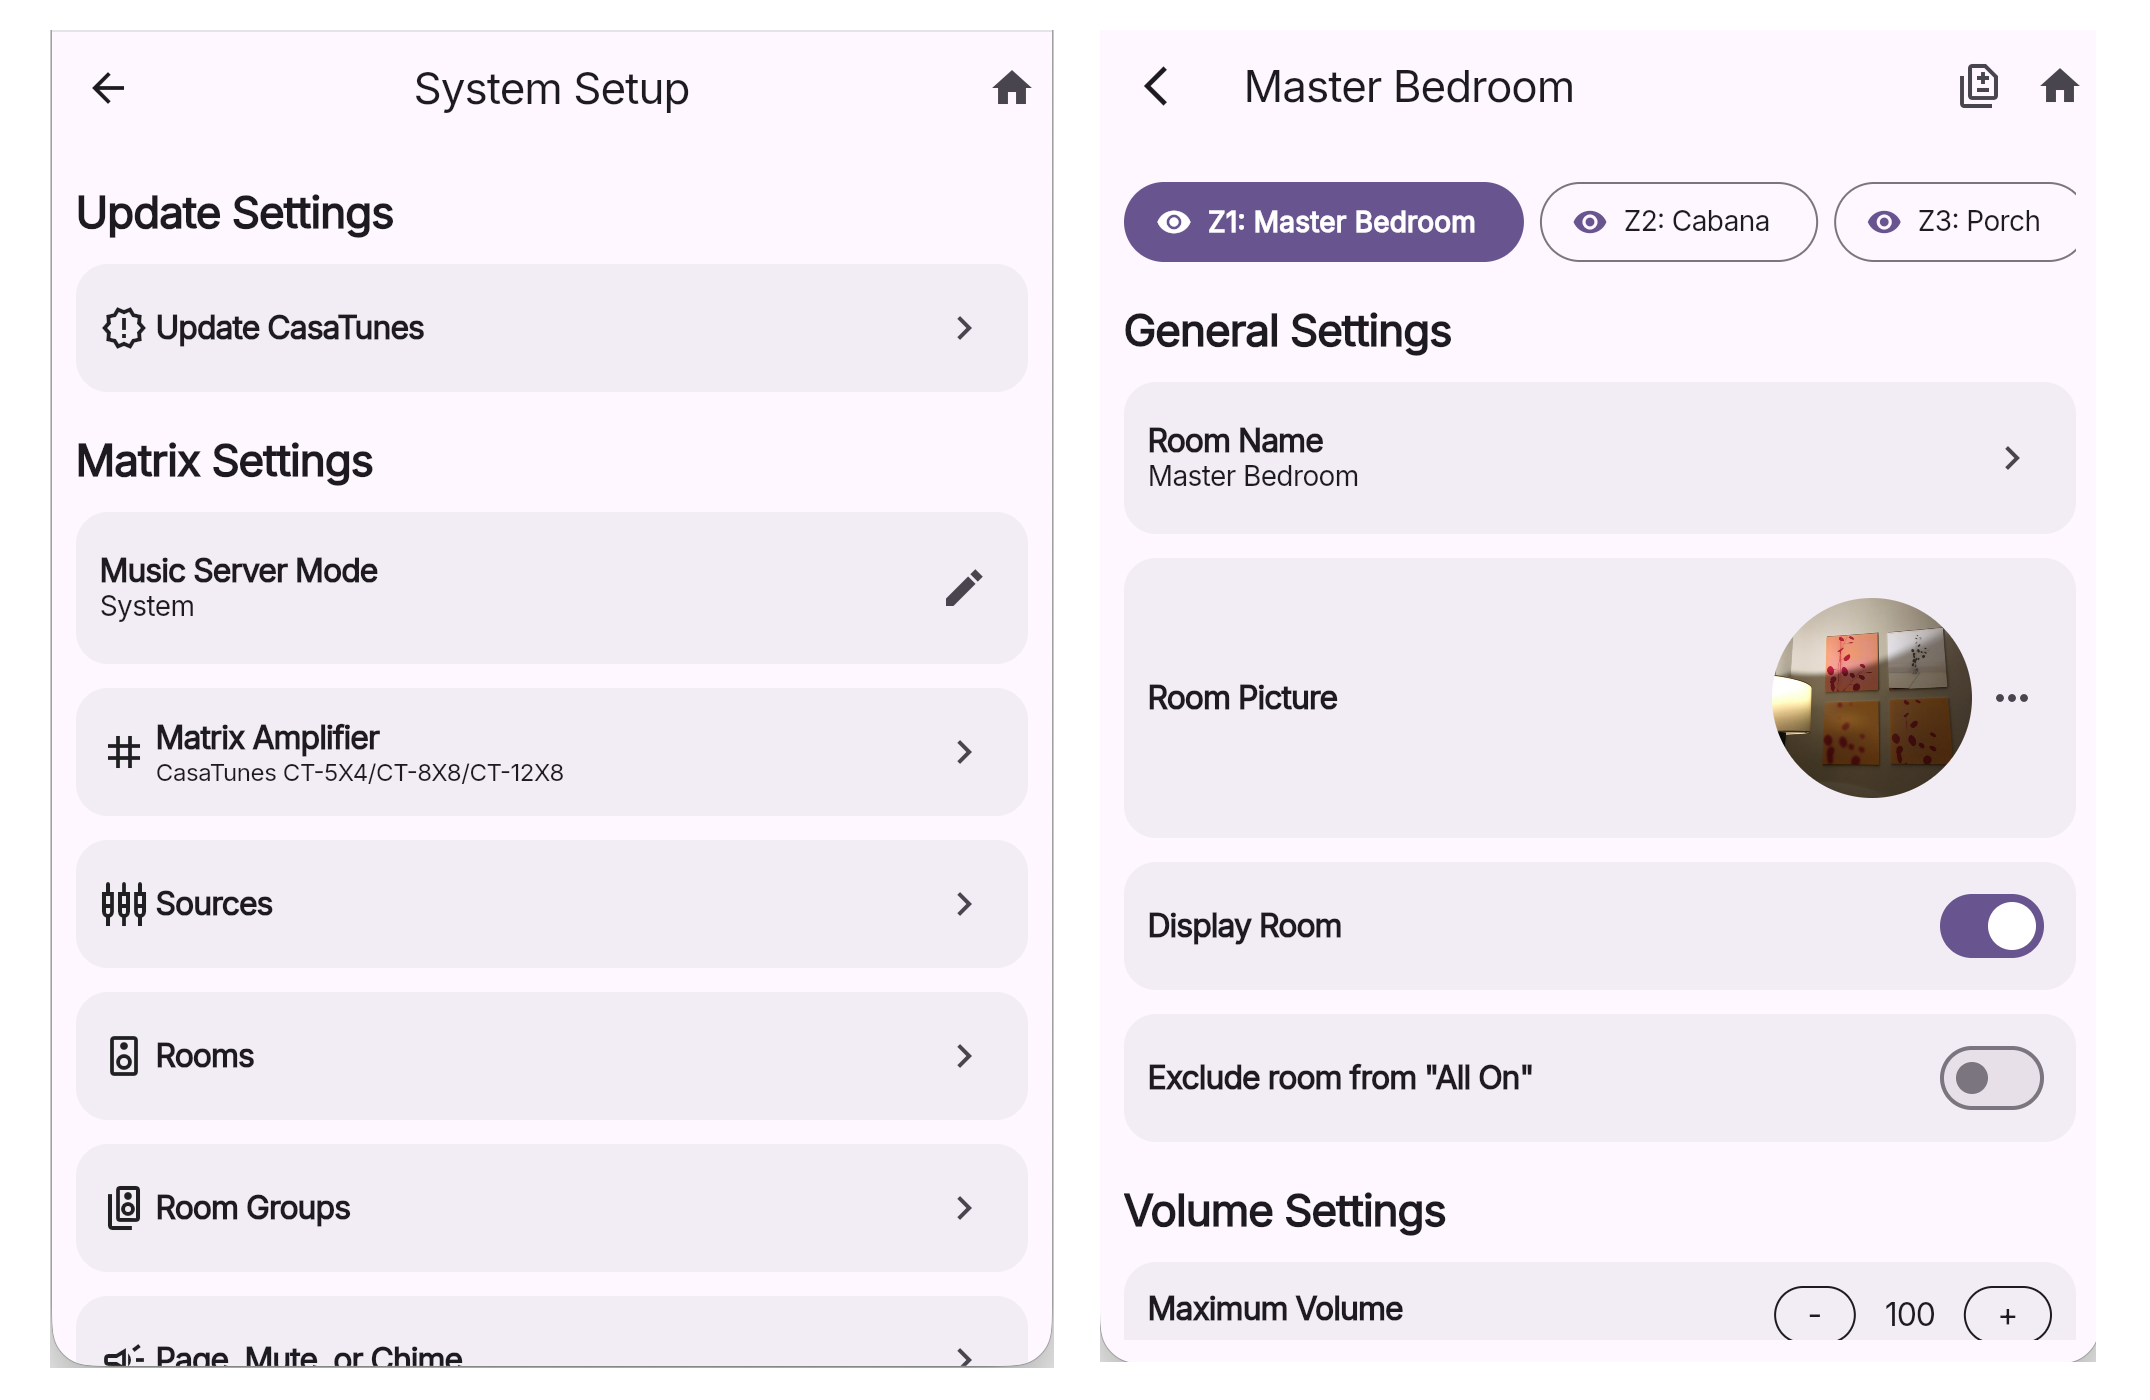
For each matrix amplifier room, you can configure the following settings:
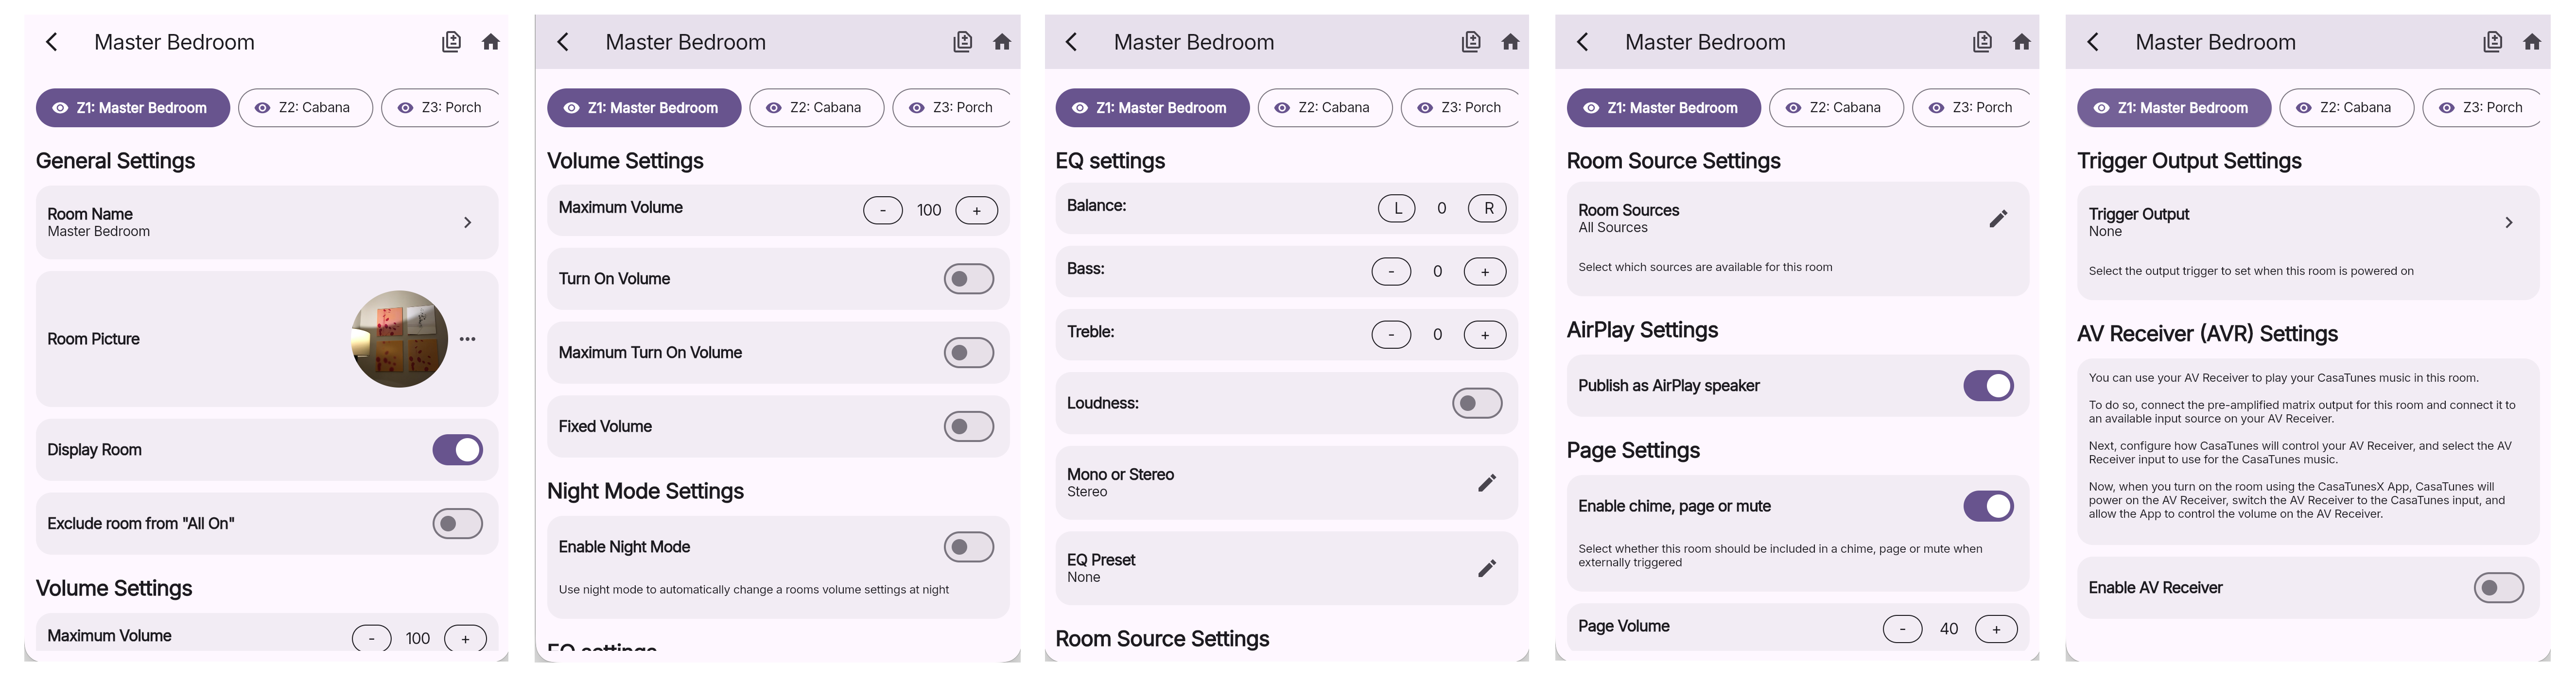
Zones 7 & 8 are two pre-amplified zones that include an optional low pass filter option. You can use one or both of these zones to connect to an Active Subwoofer, an AV Receiver, or you can connect these zones to the CasaTunes CT-250A and
CT-2100A stereo amplifiers to power these rooms.
To support using an Active Subwoofer, the CasaTunesX App provides the option of enabling a low pass filter and configuring the cut off frequency. Please read the blog post, "Adding a Subwoofer to the CasaTunes CT-12X8 Matrix Amplifier", for more information.

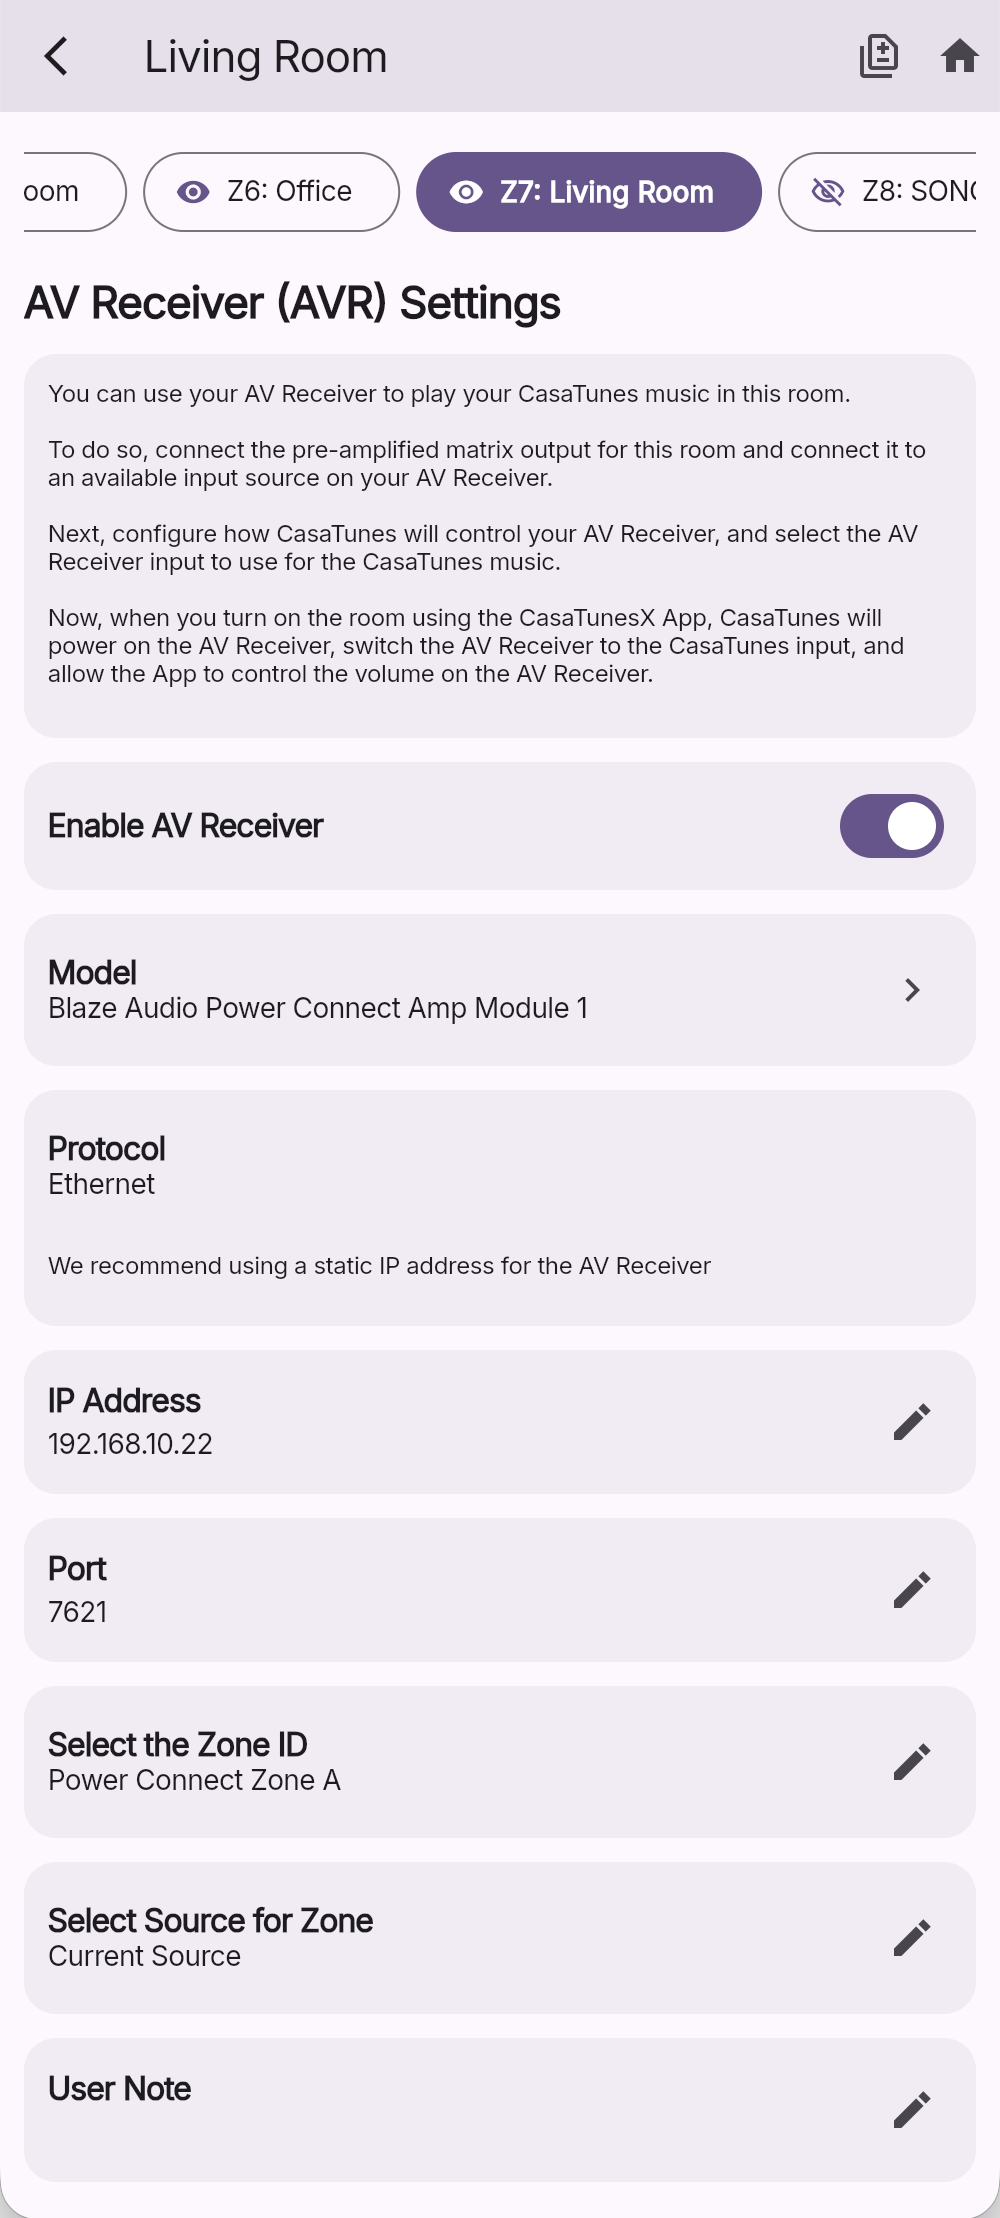
When connecting the output of Zone 7 and/or Zone 8 to an AV Receiver, you can configure the receiver model/type to be controlled, whether to use IP or serial control, the parameters for the communication protocol, and to select which AVR input is connected to the output of this zone.
CasaTunes supports many popular AV Receivers and intelligent amplifiers (as secondary power amps), including single or multi-zone receivers, as long as they support IP or serial control. From a user perspective, listening to music in a room that is powered by an AV Receiver is the same as any other room. For more information on seamless AV Receiver integration please refer to the following Tech Note.
Each CasaTunes CT-8X8MA supports up to 6 optional CT-KP2 keypads. Out-of-the-box, each keypad port is assigned to each zone on the matrix amplifier. ie. Keypad port 1 is assigned to the first zone.
You can assign a keypad port to any matrix zone, and you can also configure multiple keypad ports to control the same zone, however, you will need to use the built-in CT-8X8MA web application to re-configure the default settings.
The keypads can be used to control a room, as well as control the CasaTunes media player source, if assigned to the room.
When controlling a CasaTunes media player source, the following functionality is available:

